
I’ve been volunteering to read public domain audiobooks for LibriVox for a while. One of the challenges I have with that activity is keeping track of the status of what I’m doing. I read books and parts of books and upload the audio tracks; and I listen for errors in what other folks have done.
In order to follow everything, I have to periodically poll several web pages. The more projects one has going at one time, the longer that takes, and the more likely it is that something will get overlooked. So here’s my answer: LVTool.
LVTool is really pretty simple. The volunteer tells the tool who they are and what projects they are interested in. The tool visits all the relevant web pages (and does it a lot faster than a web browser does), aggregates the information, and displays it in one place. It also has a number of productivity enhancers, to make your job easier.
LVTool only works under Microsoft Windows. The latest version is 4.0.3.
Quick Index
Product Tour
LVTool is controlled by menus and a few check boxes; and its display is a tabbed notebook.
Readers and Listeners use the My tasks tab:

This display is basically a compilation of all of the magic windows for your projects, color-coded according to what you are supposed to do, and filtered by your task. For the reader or listener the first tab shows what you need to upload, fix or listen to.
The volunteer can directly go to the LibriVox forums, to the LibriVox Upload page or to their own catalog page from the Navigate Menu. Double-clicking on any segment on a tab takes the user to the forum page for that project. A right-click menu provides many options to automate your work. You’ll never have to type a file name or an IDV3 tag again.
The BC tab looks the same as the Tasks tab, only all the segments in the projects are shown, not just the ones assigned to you.
Once projects are added, they appear on the Projects Tab, for example (click to enlarge):

There is a right-click pop-up menu to change the project status or delete it from your list. It also includes tabulations on the status of each project.
There are some simple statistics for your reading and listening projects too:

FAQ
- Is my information secure? LVTool doesn’t ask for or look at any private information. You don’t give it your forum password, and all it does is to look at the public LibriVox web pages.
- How can this be faster than a web browser? When you look at the Project in the LibriVox forums, you go through the forum software to generate the page, and then you go through the Magic Window software to generate the Magic Window; then all of that is sent to your browser. LVTool only looks at the Magic Window, bypassing the forum entirely. It only uses the forum the first time you add a project, that just to get the Project Name and ID.
- How about a version that will run on my [Mac, Android tablet, Windows RT tablet, iPad, etc.]? Sorry; I don’t know how to do that.
- Which version of Windows is required? LVTool has been tested on Windows XP, Windows 7, Windows 8, 8.1 and 10. It will very likely work on Windows Vista.
- What was the development environment? Delphi XE4.
- How long did the project take? Less time than reading Oblomov.
- What is Hollow Tree Software? There is no Hollow Tree Software.
- Is there a 64-bit version? You don’t need the 64-bit version; these aren’t the droids you’re looking for.
What’s New
Version 4.0 begins a program of making the program more usable on touch screen. Eight new buttons have been added for frequently-used actions that previously were only available through right-click menus.
Download and Installation
- Install the Win32 (even if you’re running 64-bit Windows) Microsoft Visual C++ 2008 Run-time library. If not already installed on your computer, get it from Microsoft.
- Install the current 32-bit version of the OpenSSL libraries. You can visit OpenSSL.org and find links for downloading these libraries, or go here and download OpenSSL v1.0.0o Light. When installing, select all the defaults.
- Install LVTool itself (link here). Take all the defaults on the installation.
To insure you have an authentic unaltered version, get it only from the preceding link.
You should now find LVTool in your Start Menu and pinned to the Task Menu on the desktop.
User Guide
The First time
The first time you use LVTool, tell it who you are. The program will pop up the following dialog:

The user name is your forum user name, and the Catalog URL is the URL of your LibriVox Catalog, the page that looks like this:

If you also include the path to the Audacity (or any other program for that matter), you can start it from LVTool. If you leave it blank, it will default to the location Audacity installs for your operating system (64-bit or 32-bit). Click the … button to browse for the program.
The Audio Folder is a folder on your computer where recordings you download with LVTool will be placed, and where LVTool will expect the files to be when launching Audacity. Click … to browse for the folder.
Database Folder: You can leave this blank, but if you want to share the database on a network shared folder or on Microsoft OneDrive (formerly SkyDrive), fill in the directory name. Click … to browse for the folder. Note that if you use OneDrive, make sure that the folder is set to make all its files available offline (right-click on the folder in Windows 8 to make this setting).
Click OK to save the settings. Typically, you will never need to change settings and won’t see the form again; however, if you want to change the settings, they can be changed later by selecting Configure from the File menu or pressing Alt + C.
The next step is telling LVTool what projects you are interested in. To add a project, select New Project from the File menu or press Alt + N. A dialog is presented where you enter the URL of the Forum project page (the one where the Magic window is found):

If you are a reader, select the Read item under Interest, dedicated proof listeners pick Listen and book coordinators select Both.
Using LVTool
After all that one-time installation work is done, the fun part begins and LVTool starts doing things for you! After some projects are loaded, there is a little delay when you start LVTool while it visits the magic windows of your projects to collect information. The more active projects, the longer it takes. It is, however, faster than your visiting the pages manually.
Here are the major areas of the program:
The Navigate Menu
Selections from the Navigate Menu open a page on your default web browser:

To Do Statistics
When you start LVTool, it visits all the magic windows of the projects you’re interested in. It adds up some statistics:

The My Tasks tab
Most of the screen is filled with a tabbed notebook comprised of data grids. Here’s what it looks like (click image for full size):
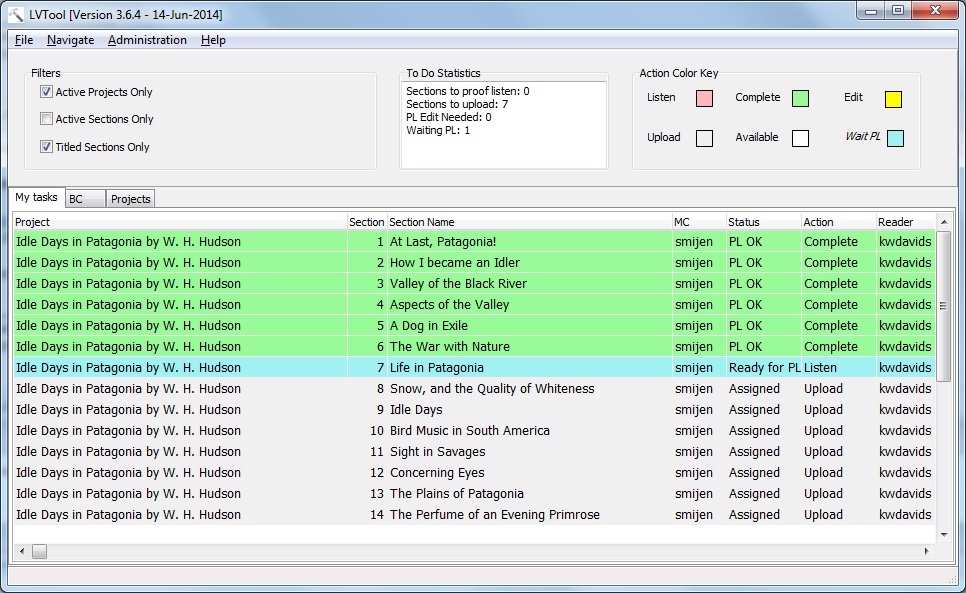
The leftmost tab is the Tasks grid. By checking or un-checking the Active Sections Only check box, you can include or exclude sections which are PL OK. The List shows the projects that you are the assigned reader, or that you have a Listen interest. There is also a check box labeled “Titled Sections Only” that is checked by default. This filters out any sections in the Magic Window without a track title; this is useful when you are filling in track titles as you go.
You can sort the grid on any column by clicking on the title above the column. You can resize the columns by dragging the vertical line separating the column titles. You can also drag the column titles to re-order the columns. While all of the important information is shown by default, you can scroll the grid to the right to see additional information.
The Action column shows what you need to do. Action is a reinterpretation of the Status values from the Magic Window.
- Complete: File Uploaded and PL OK in the notes (green)
- Listen: File Uploaded and “PL Needed” or Spot Check needed
- Upload: Assigned, but no recording URL (light gray)
- Available: Available (white)
- Edit: Uploaded recording is not PL OK.
The Complete action will only show when the Active Segments Only checkbox is unchecked (as in the example preceding).
The grid is accompanied by a powerful right-click menu filled with options to automate your work such as putting file names and ID V3 tags on the clipboard, downloading files, and starting Audacity. Here are the menu options:
- Browse Project on Forum – Launch your web browser on the LibriVox forum page for the selected project (also accessible with the Forum button)
- Go to Book Text – Launch your browser on the web page for the book text (also accessible with the Book Text button)
- Go to BC Admin – Launch your browser on the BC Admin page for the project (also accessible with the BC Admin button)
- Intro Text – Display the Intro text you should read at the open and close of the reading (also accessible with the Intro button)
- Open/Create Audacity Track – If an Audacity project exists for the track, it will be opened and if not a blank project is created and opened (also accessible with the Record button)
- Copy File Name – Put the project file name for this segment on the clipboard
- Go to Uploads Page – Launch your browser on the LibriVox uploads page (also accessible with the Upload button)
- Download recording – Downloads the section recording into your listening folder (also accessible with the Download button)
- Open listening folder – Open File Explorer on your listening folder
- Open file in Audacity – Open the section recording from your listening folder in Audacity (also accessible with the Listen button)
- Copy ID V3 Artist Name – Puts the Artist Name onto the clipboard from which you can past into the Audacity Metadata editor. If you created the Audacity project for this track with LVTool, then all of the ID V3 tags are already filled in.
- Copy ID V3 Track Title – Puts the Track Title Name onto the clipboard from which you can past into the Audacity Metadata editor.
- Copy ID V3 Album Title – Puts the Album Title onto the clipboard from which you can past into the Audacity Metadata editor.
- Copy Cell – Puts any selected item on the grid into the clipboard
Intro text
When Intro text is selected from the Sections pop-up menu, a window like this one will appear:

The one above has been resized to fit this blog; the actual version is shorter and wider. Notice that the Section number you may need in your text is displayed on the window drag bar, as is the chapter name.
The BC Tab
The BC Tab is like the Readers and Listeners tabs in appearance and function. The difference is that it shows all the sections from the projects of interest (those marked “Both” under Interest), without regard to who is assigned.
The Projects Tab
The Projects tab shows a list of all the projects of interest. If you are no longer tracking a project, say it’s completed and published, you can right-click on the row and select Deactivate Project. This moves it to the inactive status and the only way to see it is to un-check the Active Projects Only check box. You can also delete a project entirely from LVTool with the right-click menu. A set of statistics about the status of the project is also included in the grid, counts of each of the Action codes.

Several of the features of LVTool rely on reading the project information from the LibriVox Forum. When the project is created from one of the standard project templates, LVTool can find the book text page, the intro/outro text, and the file name to use when saving recordings. You can see all this information saved on the project grid by scrolling right. If the project is not formatted just so, LVTool cannot find the pieces it needs. You can manually add them to the project grid. To do that, select Allow Project Editing from the Administration Menu and type in what’s missing into the grid. It will be saved when you exit LVTool. Look at a project line that’s working to see what it should look like. If you get stuck, leave a note on this site’s contact form, giving the project URL you’re having trouble adding correctly.
Right click on a project and select Delete from the pop-up menu. You can also deactivate a project through this menu; a deactivated project stays in the database but is not shown by default, and is not checked for updates when you start the program. To reactivate a project, un-check the Active Projects Only check box, then use the right-click menu to make it active again.
File Sharing
With the latest version of LVTool, you can specify the directory where your project database is stored (basically a list of your projects, not the individual section information which is refreshed each time you open the program). This gives you the possibility of putting the database on a network shared location, or as I do, on Microsoft OneDrive. Just remember not to try to use two copies of the program open at the same time sharing a database and making changes, or else what you do with one will overwrite what you do with another (the last copy of the program to close wins).
How to do stuff
Going to the Project Forum Page
You can double-click on any of the data grids to visit the forum project page in your web browser. You can also go to the forum project page by selecting Browse Project on Forum from the Listeners, Readers or BC grids.
Starting a Recording
Here’s a scenario for starting a new recording:
- If you haven’t already added the project, do that.
- Go to the My Tasks tab and select (click/tap) the row corresponding to the section you will be recording, then click the Record button (or right-click and select Open/Create Audacity Track). If the project doesn’t already exist, then a new Audacity .aup file is created with the correct upload file name for the track. The ID V3 tags are also filled in! The file name is also copied to the Windows clipboard, in case you need it for something.
- Click the Book Text button (or right-click on the section in LVTool and pick Go to Book Text to display the text to read).
- Click the Intro button (or right-click on the section in LVTool and pick Intro Text) to display the intro/outro text for the start and end of your recording.
Uploading a File
When you’re ready to upload a recording, click the Upload button (or select Upload Page from the Navigate menu, or right-click on the section and select Upload) to take you straight to the LibriVox upload page. The file name of the currently selected section is copied to the Windows clipboard for you.
File names and ID V3 Tags
The My Tasks and BC grids have a right-click menu shown below that includes options to Copy the File name and the ID V3 tags to the Windows clipboard for pasting into Audacity.

The latest version of Audacity automatically creates new Audacity recording files with the correct file name and ID V3 tags already loaded, making this feature unnecessary in most cases.
Listen to recordings
Select a section from the grid and click the Download button (or right-click the section of interest, and select Download recording). This copies the audio from from LibriVox to your listening folder. Then click the Listen button to open it in Audacity (or right-click and select Open File in Audacity). Here’s the download dialog:

Exports
You can export your sections to a comma-delimited file that could be opened, for example, by a spreadsheet program like Open Office or Excel. Select Export sections from the File menu.
Using LVTool on a tablet computer
LVTool does not run on Windows RT, but tablet computers with Windows 8 Pro will run LVTool. It runs on the desktop. When using these instructions, substitute tap-hold for right-click. Version 4.0 adds buttons for common right-click menu picks, making it better suited for use on a tablet.
Version History
Just download and run the installation program to install an updated version.
- 3.6 Create blank Audacity projects with ID3 tags all filled out!
- 3.6.1 Handles retrieval of Text URL from certain forum template variations.
- 3.6.2 Fixed ID3 track title tag to include section number
- 3.6.3 Fixed case error for “See PL notes” status detection. Also moved installed distribution site to Microsoft OneDrive share.
- 3.6.4 More robust processing of Magic Window
- 3.6.5 Bug fixes, primarily for first time run.
- 4.0 Added buttons for common right-click functions.
- 4.0.1 Made the Intro/Outtro window non-modal, meaning that you can continue to use the main window functions while the Intro/Outtro window is displayed.